


Complete Guide on How to Make Wine
If it’s not something you’ve done before, making homemade wine can be intimidating. But, it’s not really all that complicated. Danny’s Wine and Beer has everything you need to create and enjoy great homemade wine with excellent value!
In this post we’ll go over all the essentials to make wine at home, including:
- Wine ingredients (Yeast, Grapes/Fruit based Sugars)
- Supplies needed for wine making
- Different ways on how to make wine
- General process for making wine
We encourage you to give it a try, but don’t worry. If by the end you’re still feeling intimidated or can't commit the time, you can always make wine on-site here at Danny’s Wine and Beer where we do the work for you!
Wine Ingredients
There are 3 basic ingredients in wine:
- Yeast
- A fruit-based fermentable sugar (like grape juice),
- Water
If you also count time and warmth as ingredients, that makes the total 5. (Still totally manageable!) When making wine you'll want to pay attention to these ingredients to get great tasting wine, whether it be a sweet fruit wine or a deep dry red. Since they are so important, here’s a bit about each!
Wine Yeast
Wine by definition is a fermented alcoholic beverage, usually made from grapes - and wine yeast. These are the key ingredients responsible for fermenting that creates alcohol. Simply put, yeast is a living organism that, in winemaking, is used to convert (or eat up) the sugar in fruits to produce alcohol. As this happens, flavours change and simple grape juice (or any fruit juice) can be turned into wine. To learn more about Wine yeast, Freaquently Asked Questions, and How you use wine yeast in more detail - Read our in-depth post on Wine yeast.
Fruit-based Fermentable Sugar
This is the ingredient that makes wine what it is and defines the type of wine you are making. For instance if you want to make a merlot wine, you’ll use merlot grapes, or if you are making blueberry wine you will want to use blueberries.
While the choice of yeast is important, this is really where most of the flavour, and alcohol, in your wine will come from. In liquid form, your unfermented sugar is called “must,” and you might sometimes hear experienced wine makers refer to as “grape must.”
The excellent thing about using fruit based sugars is that - besides perhaps crushing fresh fruit yourself - there aren’t any complicated steps to processing them afterwards; fruit based sugars are usually fermentable just the way they are. If you’re just starting out, we recommend that you always follow a recipe (Check out our fruit wine recipe kits), but you’ll often find that once you have your sweet fruity liquid, you’re pretty much ready to start fermenting. One important note is that while its totally okay to use store-bought concentrated juices for making wine, in order for fermentation to work, it can’t be treated with preservatives like potassium sorbate or potassium sulphite. Preservatives can kill yeast, and without yeast your sugars can’t ferment. So keep an eye out for those ingredients on your store-bought juice labels!
Generally what makes wine, “wine,” is that it is fermented from a fruit based sugar. Many other things contain sugar, like grains such as barley and corn; however, they are used in the production of beer which follows some slightly different instructions. If beer is what you’re interested in making check out our post on How to make beer
Since sugar is what yeast converts into alcohol, the quantity of the sugar and the quality of the sugar makes a big difference in the final product. In general the more sugar you have to start with, the more alcohol you can produce. That being said, there is a limit to how much fermentable alcohol you can produce. Each yeast can only tolerate a certain amount of alcohol, usually 13-16%, so fermenting some sort of 30% wine is just not possible with current yeast strains.
If you are looking to make higher percentage alcohols - this requires distilling
If your must is too sweet, then all that extra sugar will just be left at the end and you will be left with sweet wine. This is why it is important to always use a hydrometer to measure the sugar levels of your must and wine. With a hydrometer you can monitor:
- how well something is fermenting
- note when fermentation is finished
- calculate your final ABV. (Alcohol By Volume)
In addition, not all fermentable sugars have the same nutritional content - just because a sugar is fermentable, doesn’t mean your yeast will have an easy time fermenting it. Yeast converts sugar into alcohol, but it also requires other nutrients to survive and have a healthy fermentation. Some fruits are more nutritious towards yeast fermentation than others. Always make sure to consult a wine making recipe to see if you’ll need additional yeast nutrients to add to your choice of fruit sugar.
Water
Water is an often overlooked, but an essential ingredient in winemaking. Mainly because, if you are using fresh fruits or juices, nature’s already provided the water in for you! With fresh grape juice for instance, there is no need to add anymore water. However, if making wine from other fruits or berries, or from a concentrated wine kit, you may need to add some water yourself. It is important in any case that the water you are using is filtered to help prevent unwanted bacteria from growing in the wine. More than that, the type of water you use will have an impact on how your wine turns out.
Some Quick Tips:
- Don’t use chlorinated water
- Generally add yeast at 35 C water when adding the dry wine yeast
- Ways in which to dechlorinate your water is to let it sit for 24hrs
- It’s not recommended to use distilled water, as all nutrients in the water have been stripped and those nutrients help with adding flavour to the wine.
- PH of water
- Filtered water and having some nutrients are ok
Time & Temperature:
While not necessarily “ingredients,” time and temperature are the next two most important factors when making wine. It takes time for your sweet grape must to ferment into wine, and even more for it to mature and age into an excellent tasting homemade wine. It generally takes at least 4-6 weeks before wine is ready to be bottled. Warmth works hand in hand with time in accomplishing this. As living things, yeasts have a preferred temperature they like to live in and they are most productive at this temperature (often 20-23° C, depending on the type of yeast and what is being fermented). At their preferred temperature, a healthier fermentation will take place, whereas if the temperature is colder it may be slower. Warmth also affects the flavour of wine when it is fermenting and aging. Fermenting in colder temperatures with wine yeast K1-V1116 for instance, creates a more floral taste. In general, wine ages best in cooler temperatures and it is best to avoid large temperature fluctuations and extreme heat as these may produce harsh flavours in the wine. Having a thermometer and a room reliably at the desired temperature is key to producing great wines.
Necessary Wine Making Supplies
Cleaning and Sanitizing
No matter the type of wine that you plan on making, there is certain supplies that are necessary for the process. Whatever equipment comes in contact with the wine, you’ll want to ensure everything you use is clean, sterile, and food grade. Cleaning and sterilizing your equipment is one of the most important steps in wine making and there are a number of products for this purpose.
- Cleaning: Cleaning is all about removing "stuff" from the equipment; like n stains, crud, or dead yeast. It is important that all your equipment is cleaned thoroughly as these things can be the sources of bacteria that will ruin your wine. When cleaning your equipment you may want to use brushes and faucet mounted washers with products such as diversol mixed with water.
- Sanitizing: Sanitizing involves getting rid of as much of the unwanted bacteria from your equipment. This is done by using sanitizing agents such as aseptox or Sodium metabisulphite that are mixed with water.
There are plenty of cleaning and sanitizing agents each with specific features. Some may work well on one piece of equipment, but not on others. For instance, chlorine can damage stainless steel and boiling water is dangerous to use on glass because it might shatter. For more detailed information on cleaning and sanitizing, the different products available, and how best to clean certain types of equipment - view our cleaners and sanitizes chart
Basic Wine making supplies
In general, the basic equipment can be broken down into 3 categories: containers, stoppers, and tools.
Containers: When making wine you will need a minimum of 3 kinds of containers:
- A primary fermenter to begin the fermentation in. Buckets tend to make great primary fermenters because they are easy to clean and have extra space for blow off when the wine is very bubbly.
- A secondary fermenter to stabilize and condition the wine in. Secondary fermenters should be glass or plastic carboys with minimal headspace, so that the wine isn’t exposed to too much air.
- Vessels to store and serve the wine. Bottles, jugs, or bags can be used to store and serve the finished wine from.
Closures/Stoppers: These are used to protect the wine. It lets gases to escape, but doesn't let anything go into the vessal. When wine is in the primary and secondary fermenters you will want to have an airlock and rubber bung. These will seal the wine from outside contaminants, while also letting the gasses from the fermentation process to escape. Corks, screw caps, or spigots can then be used to seal the finished wine and keep air out to stop from spoiling.
Tools: There are plenty of winemaking tools that make the experience easier and can be used to enhance the quality of wine. However, if you’re looking for the basics that are absolutely necessary. They are:
- A hydrometer - to measure the sugar content of the must and wine.
- A test tube - to use with the hydrometer.
- A thermometer - to measure temperature.
- A siphon - to transfer wine between the containers and into bottles without disturbing any sediment.
- A corker - if you are corking glass bottles.
- A brush - to clean carboys.
If this is your first time, don’t fret, Danny’s has a number of all-in-one starter equipment kits ready to pick-up in store or ship.
Different Ways on Making Wine
There are endless possibilities in how to make wine, changing any one of them will create a world of different flavours.
In general though, there are 4 methods to wine making. We will expand on using fresh grapes, fresh grape juice, concentrated grape juice, and various other fruits!
Making Wine from Fresh Grapes
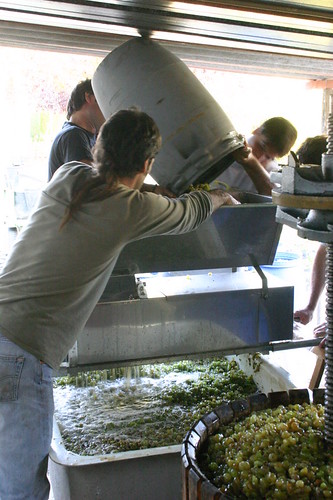
The most “authentic” way to create classic styles of white, red, and blush wines is to do so from fresh grapes. Making wine this way has its own advantages and disadvantages. While it is the purest form of winemaking and provides you with full control over the character of the wine you create (by choosing the type(s) of grape, how many to use, how long to leave on the skins, etc.), it also comes with a bit of work. Wine is a liquid, and grapes aren’t… So to make wine from fresh grapes, you’ll have to solve that by destemming, crushing, and pressing them. Doing this by hand, or foot, is quite a lot of work, especially if making wine solely from the grapes, luckily there is equipment to help make this efficient. The final drawback is that grapes are seasonal and dependent on the crop, and are only available fresh during certain times of the year, though if stored frozen they can still be used.
Once you have a must from the grapes, the safest next step is to pitch the yeast to start fermenting. Learn more with Danny's detailed instructions on how to make wine from grapes: a step by step guide.
Making Wine from Fresh Grape Juice
Using fresh pre-pressed grape juice is another way to make wine with fresh ingredients, but without the hassle of having to destem, crush, and press the grapes yourself. Fresh juice is available year round from reputable companies and generally comes in 20L plastic pails (which makes 25 bottles of wine). As a bonus, these pails can work well as a primary fermenter! They generate great tasting wine in a number of varieties and are an excellent choice for the beginning wine-maker because all of the ingredients are already accounted for.
Learn more on step by step instructions on making wine from fresh grape juice
Or view our Fresh Grape Juice Selection
Making Wine from Concentrated Grape Wine Kits
Concentrated kits are another excellent choice for making wine at home. These kits are available year round and preserve well in their compact packaging, ready to use when desired. They tend to create 23L of wine (30 bottles). They come in a wide variety of flavours and styles from sweet light fruit flavoured wines to dark dry reds with skins and oak chips included for extra body and character. Concentrated kits come with all the necessary ingredients for wine making except for the water, which has to be added to the concentrate. They also include easy-to-follow instructions on how to use them.
Visit our wine kit selection
Making Wine from Other Fresh Fruits
If grape wine isn’t what you’re after there are endless possibilities with various other fruits - peach wine, cherry wine, blueberry wine, plum wine, and the list goes on and on. Since fruits have different characteristics they may require different or specific ingredients such as pectic enzyme, a specific type of yeast, or yeast nutrient, and may also benefit from being blended with other forms of sugar, like cane sugar or dextrose.
When making wine from fresh fruit it is best to do a bit of research and consult a recipe. Experimenting with fresh fruit is part of what makes making wine at home exciting!
Visit our most popular Fruit Wine Recipe Kits
General Process of Making Wine:
While there will be some differences in terms of process depending on the method of winemaking you choose, here are some basic steps to the wine making process.
And that’s all the basics of how to make homemade wine! Once you get started it’s really not too hard. If making wine from home doesn’t seem right for you, you can visit us on-site at 127 Hamilton Road, London, Ontario if you’d like to make wine in the comfort of our facility and with helpful staff.
Leave a comment