


Buon Vino Mini Jet Wine Filter
FILTER PAD DIRECTIONS
- The #1 pads are a coarse pad, mainly used for heavy wines. These pads will produce minimal clarity in the wine. They are used as a first filtration to extract the larger suspended particles.
- The #2 pads are finer, and are used for the brightening and polishing of the wine. You should notice a brightness and clarity. These pads remove smaller suspended particles and are used for second filtration.
- If you prefer to further enhance the wine or if you plan on bottling, use our #3 pads. These pads should only be used after your wine has been filtered with our #2 pads at least once. The #3 pads assist in removing higher quantities of the yeast in the wine. NOTE: One set of pads should effectively filter 23 liters (5 gallons) of wine. Remove the pads and replace with a new set after above mentioned quantity use. Discard after use.
- If you have additional wine to be filtered you must allow the motor to cool for 45 - 60 minutes before recommencing filtration.
FILTER SET-UP
Important: Do not let the pump run dry. Wine must be racked or decanted at least once during the normal process of winemaking. Note: Prior to filtering, rack your wine into a new container.
INSTRUCTIONS FOR USE
- Use the proper pads as per pad directions.
- Remove the pads from the package and place them in a clean container with enough fresh water to cover the pads and allow them to soak for approximately 1 minute. Make sure the pads are not bunched together while soaking, allow the water to saturate on both sides of the 3 pads.
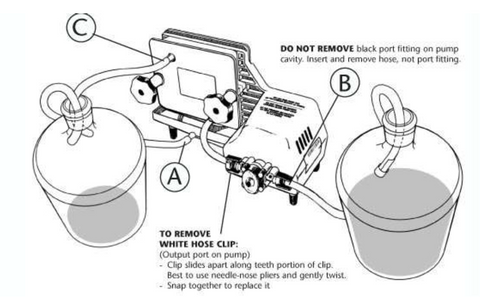
- Attach the small diameter piece of hose supplied to the fitting located under the drip tray (A on diagram). This same hose may be used for racking and cleaning your pump.
- Loosen the two black hand wheels and remove the two central plates.
- Remove the pads from the water and begin inserting them into the filter body. The coarse side will be facing the handwheels and holes will be aligned (see diagram). The pads have a tight fit. Make sure to press down on the pad so that both sides of the "T" are sitting on the two side bolts and the pad is straight along the top. Place the pad into the filter body, next place one of the central filtering plates, insert the second pad and the next platen the same manner, followed by the last pad. Once the pads and plates are inserted, all the pads and the plates should be even around the top. Note: The pads are cut in a "T" formation with one side of the "T" higher than the other. The hooks on both sides of the filter plates also have the same offset. This allows you to insert the pads and plates properly.
- Tighten the hand wheels to ensure a tight seal on the pads.
- Insert the intake hose, which contains a stainless steel wire and an anti sediment tip into the inlet on the pump (B on the diagram).
- Insert the long, slightly larger diameter outtake tube into the exit nozzle (C on the diagram).
- Place the intake hose into the wine to be filtered. Next place the outtake tube and the small tube attached to the drip tray into the container which will hold the filtered wine. If you desire, you may place the tube attached to the drip tray into a separate container and refilter this wine at the end.
- You are now ready to filter. Plug in the cord and turn on the switch located at thereat of the filter. Important: The first liquid to come out of the drainage tube (C in diagram) will be the water being pushed out of the pads. Allow this water to flow out and discard before placing the drainage tube in the clean housing container.
- The pump may initially be dry, and will not draw the wine quickly. If this happens force some wine into the pump using the intake tube.
- For your convenience you may use the pump for racking. For setup, follow the same directions as suggested for cleaning the pump (bypassing the filter plates).Warning: this feature must not be used if there are solids in the wine, i.e. oak chips, elderberries, etc.warranty will be void.
MAINTENANCE
When you have finished, clean the pump. It is important to keep your filter clean.
- Remove the short tube which had been placed on the fitting under the drip tray. Disconnect the short tube which leads from the pump to the first filtering plate and attach the drip tray tube (A in diagram) to the outlet portion of the pump, leaving the intake tube connected to the pump. You now have a direct line through the pump, bypassing the filter plates. Pump clean cold water through the pump. Place the intake tube into approx.15 liters or 3 gallons of clean water and the outtake tube into an empty container. Turn on the pump, allowing the clean water to flush out the pump.
- Turn off and unplug the cord.
- Remove the filtering plates and hoses and clean. When cleaning the drip tray be very careful. Do not allow any water to get into the motor section.
- From time to time, place some petroleum jelly on the threaded portion of the two side bolts, keeping them lubricated.
SUGGESTIONS FOR GOOD FILTRATION
Filtration is the last step in wine making. Its purpose is to farther clarify and help remove
unnecessary by-products and a high percentage of yeast in the wine. In order to achieve
optimum results we suggest that a waiting period of at least 5 days must elapse between
filtrations as you progress to tighter (lower micron size) pads. To further enhance and maintain the wine, it should be properly balanced and stabilized before filtering. Use a commercially accepted stabilizer like TANNISOL, which contains the proper percentages of products in combination form and simplifies the process of wine stabilization. (Follow proper directions.)
THE FOLLOWING SUGGESTIONS AND RECOMMENDATIONS ARE MADE AVAILABLE TO THE HOME WINE MAKER TO OBTAIN THE BEST RESULT IN WINE MAKING AND FILTERING WITH THE BUON VINO SUPER JET
Filtration is the last step in wine making, Just as you take precautions while you are fermenting and preparing your wine, filtration also required some basis of understanding. A young wine (30 days old) is not ready for FINE filtration. As per our instructions and wine making directions this is the racking and maturing stage for the wine.
- If you are using gelatine and or bentonite in your wine and if these products have not settled sufficiently, this will cause a coating effect on your pads. You may experience hack pressure, which may cause excessive leakage and or slower output.
- FOR BEST RESULTS: Wine should be 2-3 months old and kept in as cool a spot as you have in you home prior to filtration. During this time the wine will mature, achieve better body and allow the suspended particles and products to drop naturally. At this stage you may proceed to filter with the #2 pads to achieve the shine and sparkle in your wine. You then may follow up with our #3 pads. For better results allow 2-4 days between filtrations.
- If you wish to filter a young wine (30 days old) we recommend using #1 pads first. You may filter with the #2 pads immediately after filtering with the #1 however the wine is in an agitated state and it would be advisable to wait 2-4 days between filtrations. You may then follow with the #3 after 2-4 days.
- A young wine that is being filtered may come through the unit agitated, due to a high content of CO2 that may be present in the wine during fermentation, this is normal. Continue filtering into your clean container. Within 10-15 minutes your wine will stabilize and you will seethe clarity achieved in filtering.
- We do not recommend bottling your wine directly from the filter; you should filter from carboy to carboy. Your wine is being pumped through the filters and is in an agitated state and should not be bottled as such. Allow your wine to rest for a few days before you bottle. Wine should be bottled using proper bottling equipment. These are some recommendations provided to the home wine maker by BUON VINO, to help you achieve better results in your winemaking and filtering.
FOR FURTHER INFORMATION ABOUT WINE MAKING AND FILTERING CONSULT WITH YOUR HOME WINE MAKING RETAILER. IMPORTANT SAFEGUARDS
Read all Instructions and safeguards. The following basic safety precautions apply when using electrical appliances:
- Do not touch surface that may be hot. Use handles or knobs provided.
- To protect against electrical shock, do not immerse cords, plugs, portable appliances (or other specific part or parts) in water or other liquid.
- Close supervision is necessary when any appliance is used by or near children.
- Portable - Remove plug from outlet when appliance is not in use, before putting on or taking off parts and before cleaning.
- Permanently installed - Make sure appliance is OFF when not in use, before putting on or taking off parts and before cleaning.
- Portable - Do not operate any appliance with a damaged cord or plug, or after the appliance malfunctions or is dropped or damaged in any manner. Return appliance to the nearest authorized service facility for examination, repair or electrical or mechanical adjustment.
- The use of accessory attachments not recommended by the appliance manufacturer may cause injuries.
- Do not use outdoors (this item may be omitted if the product is specifically intended for outdoor use).
- Do not let cord hang over edge of table or counter or touch hot surfaces.
- Do not place on or near a hot gas or electric burner or in a heated oven.
- Where applicable, always attach plug to appliance and check that the control is OFF before plugging cord into wall outlet.
- Do not use appliance for other than intended use.
- Avoid contacting moving parts.
- NEVER dismantle motor - call before touching any motor parts.
Leave a comment